Dairy Free "Cheesy" Potato Omelet


Obviously this is not a vegan dish, however I have said before that I only use eggs from my mother in-law because I know these chickens.  I know they're happy and well taken care of, and I suggest if you eat eggs you try to find someone local to get them from.

The cheese substitutes were really good, and just as satisfying as real cheese.
Here's what I used. One slice inside when the omelet was almost done, and about a tablespoon of nutritional yeast. Then, another slice on top once I flipped it.
If you use nutritional yeast make sure you find a brand that is vitamin B fortified, especially if you're vegetarian.

Ingredients:
3 medium red potatoes
1 or 2 tablespoons evoo
1 tsp paprika
1 tsp dried oregano
3 farm fresh eggs
1 tbl spoon nutritional yeast
2 slices of vegan cheese
Salt and Pepper to taste
1 diced tomato (optional)

Heat large skillet to med-high.  Coat pan with olive oil.  Dice potatoes. Fry em up for about 20 or so minutes.  When you see them starting to brown, turn them down to medium low.  Add your spices.  Meanwhile, beat your eggs and add a little cold water. Dice up a tomato to top it at the end if you want.  Add the beaten eggs. Using a silicone spatula, push around the edges and stir the middle gently until the eggs are mostly set.  Pull one slice of cheese in strip and add to the middle, along with the nutritional yeast.
Flip one side over with bigger spatula to make your omelet.  Top with another slice of cheese, and cover to allow time to melt.  Plate it and top with tomato and salt and pepper and oregano.
Eat!


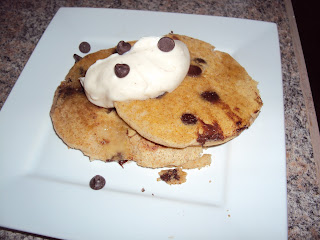
Vegan Chocolate Chip Pancakes with Whipped Cinnamon Vanilla Cream Cheese


So, after our wedding we couldn't take a honeymoon.  However, I am determined that we will some time.  But, my husband got a few days off work, so we had some extra family time which is always great!
So, I told him I would make a special breakfast, and this is what we had.  Not your everyday healthy start, but it tastes amazing!!
This is an easy easy version.

The way I did it was totally vegan.  You wouldn't be able to tell, and you won't miss the animal products in this tasty treat, promise!

Pancakes:
Makes 4-6 (Very Filling)
1/2 cup whole wheat flour
1/2 cup all purpose flour
1 tablespoon sugar
2 tablespoons baking powder
dash of salt
dash of cinnamon
2 tablespoons canola oil
1 tsp vanilla
1 cup almond milk or any non dairy milk you like
2-3 tablespoons vegan chocolate chips. (Ghiradelli semi-sweet)


Preheat a large skillet on medium with some canola oil.  In a large bowl add all dry ingredients and stir.  Then, add the rest except chips and mix well. It will be thick which will make for some awesome and filling cakes.  Lastly, fold in a couple of tablespoons of the chips.

Cream Cheese:
1 8oz tub of Tofutti Cream Cheese
2 tsp vegan butter
1ish tsp of cinnamon
1 ish tsp of vanilla
1-3 tablespoons of sugar

I used some short cuts on this to save time.  Put all of the cream cheese in a medium bowl and microwave for a few seconds to soften.  Add the butter and micro again for another 10 or so seconds.  Then, you can even skip the mixer and whip with a whisk!  Whip until smooth and combined.  Add the rest of ingredients, and sugar to taste.  Whip again until mixed.  Use a spatula to get all the goodies out of the whisk.


Make your pancakes and I like to add a few more chips when they are cooking and some to garnish, and they get all melty!  The pancakes won't bubble like normal cause they are thick, so just watch them.  Flip them when they are golden. Serve right away, enjoy!!


What's left of my beautiful wedding bouquet!  Designed and arranged by my mother!


Neutral Ombre Nails and Bachelorette Party


I used a nude opi color and a yellow nail art.  This look requires some layering and a little work, but looks really good if you take the time.
Start by applying your nude base coat and allowing it to dry.
Then, apply your yellow color to a sponge thats cut small so it doesn't make too big of a mess on your hands. Then, just apply it from one side to the other.
Then you need to layer.  So, you will get another sponge and dip it in some nude color and start layer on where the nude already is and overlapping the yellow a bit. This creates the gradient effect.  Do this with the yellow and then again with the nude.  You don't have to let the polish dry for this.
Once you are done put on a few coats of a shiny topcoat!  Then, just dip a q tip in polish remover to clean it all up.  That's it! Lasts a long time and looks really good!


So, my bachelorette party was so fun!
Here's me and my beautiful momma..
I had some yummy vegetarian food at an Asian restaurant

Then went to a comedy club and a nightclub, it was a great night!